Drone Mapping Workflow Part 2: Mission Planning, Regulatory Notices, and On‑Site Survey
🗓️ July 23, 2025 by Robert Lawrence
Pre-Flight Planning and Regulatory Workflow
As a solo operator running photogrammetry missions with the DJI Mavic 3 Enterprise and RTK base station, I follow a field-tested, Transport Canada–compliant workflow that emphasizes safety, precision, and efficiency—while keeping costs lean and avoiding unnecessary software or subscription bloat.
1. Define Mapping Objectives and Deliverables
Before launching a mission, I clearly define the project’s technical requirements:
- Primary outputs: Orthomosaic, 3D point cloud, DSM/DTM, volume analysis, or contour maps
- Accuracy requirements:
- Absolute (Global) Accuracy: Needed when data must align with real-world coordinates (e.g., WGS84, UTM)
- Relative Accuracy: Sufficient for internal site modeling or consistent measurements across a single map
- Coordinate system and units: Based on client needs or regional standards (e.g., UTM Zone 11N, metric)
- Site characteristics: Estimated acreage, terrain type (flat, sloped, forested), and surrounding obstructions
I base flight parameters on these needs—but I always follow a minimum of 80% frontlap and 80% sidelap, regardless of project type. This overlap standard gives me the flexibility to:
- Ensure clean photogrammetry tie-points, even in difficult terrain
- Reduce artifacts in DSMs and orthos
- Improve accuracy for post-processing with GCPs or RTK/PPK
Depending on lighting or surface reflectivity, I sometimes increase overlap even further.
2. Conduct a Thorough Preliminary Desktop Survey
This is where I scope out the site using publicly available tools to assess risk, airspace, and surrounding factors:
🗺️ Tools I use:
- Google Earth Pro – For site terrain, distance measuring, and overview planning
- RPAS Wilco – For mission reference layers including VLOS restrictions, built-up areas, and airspace classification
- Nav Drone Web Viewer – To view interactive controlled airspace overlays and NOTAMs
- Canada Flight Supplement (CFS) – To review airport, heliport, and seaplane base data in my region
- VFR Navigation Charts (VNCs) – For topographic context, elevation, and obstacle clearances
- SunCalc or Photopills – For analyzing lighting and shadow angles at the time of flight
🔍 What I check:
- Is the area within controlled airspace?
- Are there aerodromes, helipads, seaplane bases within 3 NM?
- Are there towers, powerlines, or LOS obstructions?
- Are public roads, people, or animals likely to be present during flight?
- What are the terrain elevations and slope risks?
This step ensures I fully understand the site conditions before I arrive.
3. Regulatory Notifications and Airspace Approvals
Depending on the site and its airspace classification, I prepare and submit the following:
✅ Nav Drone (NAV CANADA) Submission
- I file every operation through Nav Drone Canada to register the flight area, altitude, time, and purpose.
- If the site is in controlled airspace, I submit a Request for Authorization, which includes a buffer time for approval (can take hours to days depending on the region).
- Nav Drone also checks for potential conflict with military zones, flight paths, or NOTAMs.
✅ Airport & Heliport Notification
- If within 3 NM of an uncontrolled aerodrome, heliport, or water aerodrome, I refer to the Canada Flight Supplement (CFS) to find operator contact info.
- I email or phone the airport authority directly with:
- My RPAS flight location and altitude
- Estimated duration
- Contact number and RPAS certificate reference
- Emergency procedures on file
✅ Municipal or Local Coordination (if applicable)
- If operating in public parks, near highways, or on Crown or First Nations land, I may notify the municipality, property manager, or safety officer to coordinate access and safety boundaries.
📁 All correspondence, screen captures, and Nav Drone records are stored in a dedicated folder for that project.
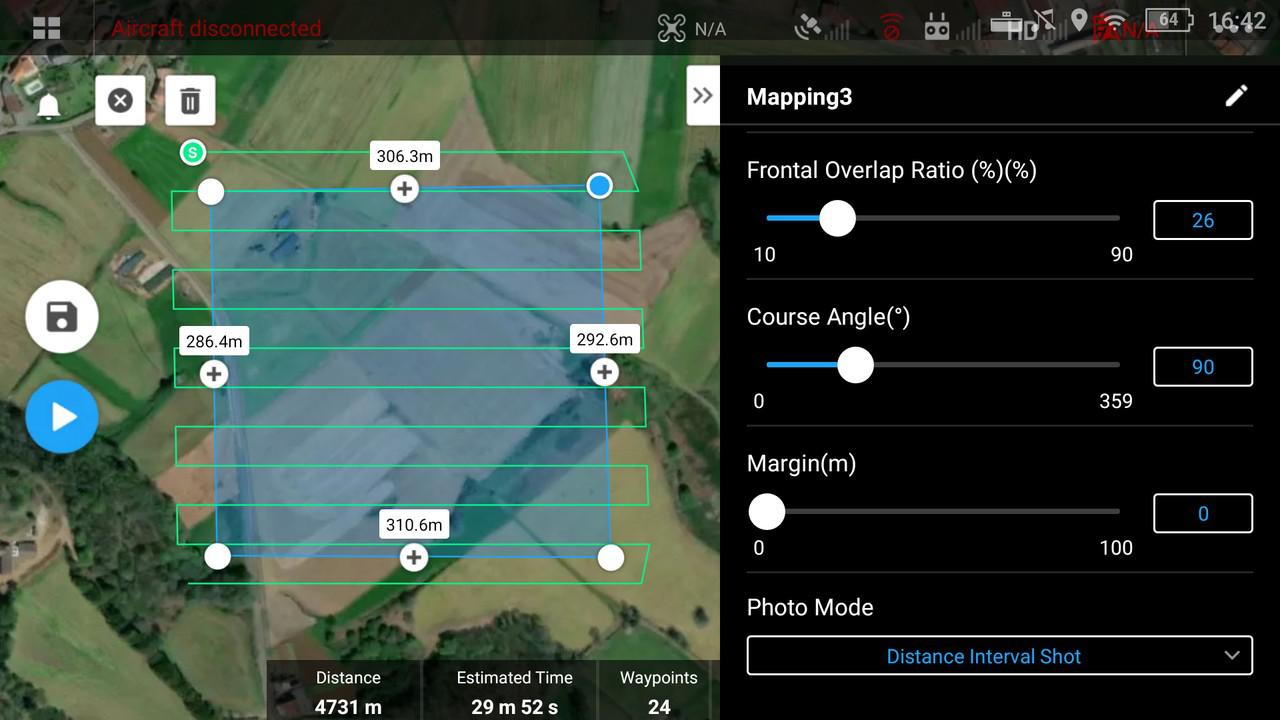
4. Mission Planning Using DJI Pilot 2
I use DJI Pilot 2, which is natively supported by the Mavic 3 Enterprise, to plan all flight paths:
- Define area polygons or linear paths depending on the terrain
- Adjust GSD and altitude based on desired resolution and airspace ceiling
- Set overlap values to 80% frontlap and 80% sidelap minimum
- Configure camera angle (typically nadir for orthos)
- Enable RTK settings, select custom coordinate system, and verify link to DJI D-RTK 2 base
- Assign photo interval or timed shutter based on flight speed and coverage
🧠 I also pre-plan for battery swaps, check wind speed thresholds, and verify takeoff zones from Google Earth with real-world LOS expectations.
5. Conduct On-Site Physical Survey (During GCP Setup)
Once on location, I perform a detailed physical survey of the site while simultaneously collecting static GNSS data at my GCPs, as outlined in Part 1.
📋 Site Survey Tasks:
- Confirm all hazards observed in desktop survey: poles, trees, fences, terrain drop-offs
- Walk perimeter to verify line-of-sight (LOS) is maintained throughout the planned flight
- Identify and mark takeoff and landing zones
- Use cones or signage if near roads or public access areas
- Photograph GCPs and site markers for post-mission documentation
The site survey ensures that the planned mission from DJI Pilot 2 is safe and practical in the real world. Any deviations are corrected on the spot.
6. Equipment Setup and System Checks
Before takeoff, I follow a structured pre-flight checklist:
- Mavic 3 Enterprise:
- Props, motors, sensors inspected
- IMU, compass, and gimbal check
- SD card and image storage verified
- RC Pro Enterprise Controller:
- Mission plan loaded and confirmed
- Battery level full
- Map tiles pre-cached if no connectivity
- DJI D-RTK 2 Base Station (if using real-time RTK instead of post-processed):
- Mounted level with clear sky view
- Properly positioned with coordinates saved
- Sync established with M3E before flight
- Other essentials:
- Batteries charged (and extras available)
- ERP documents printed and carried
- Fire extinguisher and first aid kit on hand
7. Safety and Emergency Protocols
Every flight operation is conducted under my Standard Operating Procedures (SOP) and supported by a written Emergency Response Plan (ERP).
🛑 Before each flight:
- ERP reviewed and printed
- Emergency contact numbers ready
- Airband radio or mobile communication active if near controlled airspace
- RTH altitude set to clear highest obstruction plus buffer
- Geofencing and max altitude constraints configured
- Weather conditions verified: wind, visibility, temperature
📌 If an emergency arises (e.g., flyaway, battery issue, loss of signal), I follow the ERP checklist for:
- Controlled landing or auto-RTH
- Securing area and contacting authorities if needed
- Incident documentation and reporting to Transport Canada if reportable
🔍 Why This Process Works
- Designed for solo operators: simple, scalable, cost-efficient
- Compliant with Transport Canada’s Advanced Operations requirements
- Built around real-world tools: Pilot 2, RPAS Wilco, CFS, Nav Drone
- Seamlessly integrates with GCP data from static GNSS logging
- No dependency on cloud-based subscriptions or expensive flight planners
⏭️ Coming Up in Part 3: Data Capture & Post-Processing
In the next entry of this workflow series, I’ll walk through how I execute the mapping flight with the Mavic 3 Enterprise, inspect the imagery, and process the data using DJI Terra and GIS tools.
Author:
Robert Lawrence, Advanced RPAS Pilot and Founder of High Attitude Drone Solutions, Inc.
Precision Mapping & Aerial Imaging for Construction, Land Development, and Industry.